Life expectancy of my rooftop solar system
06 February 2023
The endurance of the structure, the inverter, and the solar panels themselves are some of the elements that affect how long a solar system lasts.
A typical 25-year warranty is included with the vast majority of solar panels now on the market, but there is more to it than that, and it has to do with how solar panel warranties are structured. Solar panel warranties cover physical flaws often for a period of 10 to 20 years, depending on the brand. The majority of panel warranties ensure that your panels will function at a minimum efficiency of 80% or higher at the end of 25 years. There are other guarantees that guarantee a specified quantity of output, often for a 25-year term. This translates to an annual efficiency decline of less than 1%.
Solar panel performance degradation is a natural process that occurs over time. There are several factors that contribute to this degradation, including exposure to sunlight, temperature fluctuations, humidity, and other environmental factors. The degradation of solar panel output can result in a reduced efficiency in generating electricity, which may lead to a decline in overall system performance.
One of the most significant factors that contribute to solar panel degradation is the exposure to sunlight, which can cause a process known as photovoltaic (PV) cell corrosion. This corrosion is caused by the formation of tiny cracks and defects on the surface of the solar cells, which can lead to a reduction in their efficiency.
Additionally, temperature fluctuations and humidity can cause the solar panel's protective coatings to deteriorate, leading to further damage. Another element of the environment that might affect solar panels is wind. Dynamic mechanical load, which is brought on by strong winds, can cause the panels to bend. The panels also develop microcracks as a result, reducing output. Some racking options shield the panels from powerful uplift forces and reduce microcracking in high-wind environments. The manufacturer's datasheet will often provide information on the highest winds the panel is capable of withstanding. Installing properly might aid in resolving problems with heat. Convective air should be able to flow beneath the panels and cool the machinery if they are situated a few inches above the roof. In order to reduce heat absorption, light-colored materials have been utilized to make panels. Additionally, components with heat-sensitive performance, such as inverters and combiners, should be placed in shaded locations.
Solar panel performance degradation is a natural process that occurs over time. There are several factors that contribute to this degradation, including exposure to sunlight, temperature fluctuations, humidity, and other environmental factors. The degradation of solar panel output can result in a reduced efficiency in generating electricity, which may lead to a decline in overall system performance.
One of the most significant factors that contribute to solar panel degradation is the exposure to sunlight, which can cause a process known as photovoltaic (PV) cell corrosion. This corrosion is caused by the formation of tiny cracks and defects on the surface of the solar cells, which can lead to a reduction in their efficiency. Additionally, temperature fluctuations and humidity can cause the solar panel's protective coatings to deteriorate, leading to further damage.
To compensate for the degrading performance of solar panels, there are several strategies that can be implemented. One approach is to regularly clean and maintain the solar panels, which can help to prevent the buildup of dirt, debris, and other contaminants that can reduce their efficiency. Additionally, regular maintenance can help to identify and repair any damage that may be affecting the panel's output.
Another approach to compensating for the degradation of solar panel output is to install a larger solar array than what is currently required. This can help to compensate for any losses in efficiency and ensure that the system continues to generate enough electricity to meet the user's needs. Additionally, some solar panel manufacturers offer warranties and guarantees for their products, which can provide some assurance that the panels will continue to perform well over their expected lifespan.
If you purchase a 530 watt solar panel now, for instance, you may anticipate that they will still be providing at least 424 watts after 25 years. Even after the warranty expires, your system is still producing 80% of its initial output, so there is no reason you shouldn't be able to keep using that power. Often, you can counteract the drop in efficiency by adding an extra panel or to your solar array. These are some things you can do to extend the life of your system. The first thing to be aware of is part replacement schedule and or extended warranty.
On average, your inverter should be replaced every 10 to 15 years. The solar inverter typically has to be replaced during the course of your solar system's lifespan since it is the component that transforms DC power into AC electricity for usage in your house. If your inverter does not have a 25-year guarantee, you may generally purchase warranty extension. Inverter warranties commonly last between 5 and 10 years. Depending on the battery chemistry you select and how you want to care for them, the batteries in a battery-based system must be replaced on schedule, which can range from every 5 to 15 years. Last but not least, easy and regular maintenance keep the panels in excellent condition and providing energy effectively. Clean them once a month by keeping them free of dust, leaves, bird droppings and other debris.
To ensure the longest possible lifespan for your rooftop solar system, it's essential to take good care of it. Here are some tips for caring and maintaining your solar system.
1. Keep the solar panels clean:
Dirt, dust, and debris can accumulate on the solar panels, reducing their efficiency. Clean the panels regularly using a soft brush or a cloth with soapy water.
2. Check for shading:
Shading can significantly affect the performance of solar panels. Regularly check for any trees or structures that may cast shade on the panels and remove them if necessary.
3. Check the inverter:
The inverter is a crucial component of the solar system, and it needs to be functioning correctly. Check the inverter's display for any error messages or warning signs and contact a professional if you notice any issues.
4. Monitor your systems performance:
Regularly monitor your solar system's performance to ensure that it is generating the expected amount of electricity. If you notice a drop in performance, contact a professional to diagnose the issue.
5. Have your system professionally inspected: Its a good idea to have your solar system inspected by a professional every few years to ensure that all the components are functioning correctly and to identify any issues that may affect the system's lifespan.
In terms of investment payback period, it varies depending on the cost of the system, the amount of electricity generated, and the cost of electricity from the grid. However, in general, a well-designed and installed solar system can pay for itself in 4 to 10 years, depending on these factors.
By doing these actions, you can guarantee that your solar panels survive as long as possible by reducing any strain on them and making them work less. You'll be made aware of any potential warranty concerns early on thanks to maintenance. Make sure to get in touch with your supplier if you notice anything strange about your solar panels so they can send you the replacement parts you need to maintain your system operating smoothly. Your solar panels will last longer and absorb more sunlight if you maintain them clean.
Choosing solar panels for rooftops
07 February 2023
When selecting solar panels for a rooftop installation, several factors should be considered:
Available roof space:
The size and layout of the rooftop will determine the number and type of solar panels that can be installed.
Energy consumption:
The daily energy consumption of the household or business will determine the required size of the solar system.
Local weather conditions:
The amount of sunlight that the solar panels will receive will vary based on the location, weather patterns, and shading.
Budget:
The cost of the solar panels will depend on the brand, size, and efficiency of the panel.
The specifications of solar panels that should be considered when selecting the best panel include:
Wattage:
The wattage of the panel determines how much energy the panel can produce.
Efficiency:
The efficiency of the panel determines how much energy the panel can produce per square meter of surface area. Higher efficiency panels are typically more expensive.
Voltage:
The amount of electrical potential the panel can produce, measured in volts (V).
Current:
The amount of electrical current the panel can produce, measured in amps (A).
Open Circuit Voltage (Voc):
The maximum voltage the panel can produce when it is not connected to a load.
Short Circuit Current (Isc):
The maximum current the panel can produce when its terminals are shorted.
Temperature coefficient:
This measures how much the panel's output will decrease as the temperature increases.
Durability:
This includes factors such as the panel's weather resistance, lifespan, and warranty.
Dimensions:
The physical size of the solar panel, measured in length, width, and thickness.
Weight:
The weight of the solar panel, typically measured in kilograms (kg) or pounds (lb).
To determine the number of solar panels required, the daily energy consumption of the household or business should be divided by the wattage of the solar panel.
For example, if the daily energy consumption is 20 kilowatt-hours (kWh) and the selected solar panel is 300 watts, then 67 panels would be required (20,000/300 = 66.67).
The number of solar cell count in a solar panel is also an essential factor to consider during the installation of a solar panel system. The number of solar cells determines the power output of the panel, and it also affects the efficiency of the solar panel system.
Each solar cell generates a specific amount of electrical power, which is determined by the physical properties of the cell, such as its size, material, and manufacturing process. The total power output of a solar panel is the sum of the power output of all the individual solar cells in the panel.
When installing a solar panel system, the number of solar cells in the panel is determined by the power output required to meet the energy needs of the system. This calculation is based on the amount of energy the system needs to generate, which is determined by the energy consumption of the appliances and devices that will be powered by the system.
The following factors should be considered when determining the number of solar cells needed for a solar panel system:
Energy consumption:
The amount of energy needed to power the appliances and devices in the system.
Solar cell efficiency:
The efficiency of the solar cells used in the panel, which is the percentage of the sunlight that is converted into electrical power.
Solar panel size:
The physical size of the solar panel, which is determined by the number of solar cells and the size of each cell.
To calculate the number of solar cells required for a solar panel system, the following formula can be used:
N = E / (A x H x EFF)
Where:
N = Number of solar cells
E = Energy needed to power the system in watts
A = Area of one solar cell in square meters
H = Number of peak sun hours per day
EFF = Efficiency of the solar cell in decimal form
For example, if a solar panel system requires 5000 watts of power, uses solar cells with an efficiency of 18%, has an area of 0.016 square meters per cell, and receives an average of 5 peak sun hours per day, the number of solar cells required can be calculated as follows:
N = 5000 / (0.016 x 5 x 0.18)
N = 8731 solar cells
Therefore, a solar panel system with these specifications would require 8731 solar cells to generate the required 5000 watts of power.
Whether it is better to use smaller wattage multiple panels or higher wattage less quantity panels depends on the available roof space and the energy consumption. In some cases, using higher wattage panels with fewer panels can be more cost-effective due to the reduced installation and wiring costs. In other cases, using smaller wattage panels with more panels can be more effective in maximizing the available roof space.
It is also important to consider the brand and quality of the solar panels. It is recommended to choose a reputable brand with a proven track record of quality and durability. Additionally, the installation of the solar panels should be performed by a qualified professional to ensure that the panels are installed properly and are able to produce the maximum amount of energy.
Factors to take into account in Kerala while installing rooftop solar panels
07 February 2023
Installing rooftop solar panels in Kerala requires careful consideration of a number of factors, including the available space, orientation and tilt angle of the roof, shading, and the amount of sunlight received in the area. Some of the key points to consider before installing rooftop solar panels in Kerala include:
Space and orientation
The available space and orientation of the roof are crucial factors to consider when installing solar panels. In Kerala, south-facing roofs generally receive the most sunlight, while north-facing roofs receive the least. East and west-facing roofs receive moderate amounts of sunlight.
Tilt angle
The tilt angle of the panels should be optimized for the latitude of the location. In Kerala, the optimal tilt angle is around 10-15 degrees.
Shading
Shading from trees, buildings, and other obstructions can significantly reduce the amount of sunlight received by the solar panels. It is important to ensure that the panels are not shaded during peak sunlight hours.
Wiring and interconnection
The wiring and interconnection of the solar panels to the electrical system of the building must be done in accordance with local regulations and safety standards.
There are various subsidies available for rooftop solar installations in Kerala. The Kerala State Electricity Board offers a net-metering program, which allows excess solar power to be fed back into the grid and provides credits on the electricity bill. The government of India also offers various subsidy schemes for rooftop solar installations, such as the Grid-connected Rooftop Solar scheme and the Off-grid and Decentralized Solar Applications scheme.
The steps involved in installing rooftop solar panels in Kerala include:
Site assessment
A qualified technician or solar installer will conduct a site assessment to determine the feasibility of the installation and to determine the optimal placement and tilt angle of the panels.
System design
Based on the site assessment, the solar installer will design the system, including the number and type of panels, inverter, and other equipment needed.
Permitting and approvals
The solar installer will obtain the necessary permits and approvals from the local authorities, including building permits and electrical permits.
Installation
The solar panels and other equipment will be installed on the roof, and the wiring and interconnection to the building's electrical system will be completed.
Commissioning The system will be tested and commissioned to ensure that it is functioning properly and generating the expected amount of power.
Which is better for attaching solar panels: GI structure or aluminium structure?
05 Aug, 2023 06:14:09
The choice between a GI structure and an aluminum structure for mounting solar panels depends on various factors such as cost, durability, weight, and maintenance.
GI (Galvanized Iron) mounting structures are a cheaper option and can be used for small-scale solar projects. However, GI structures are not as durable as aluminum structures, and they tend to rust and corrode over time. This can lead to a shorter lifespan and higher maintenance costs.
Aluminum structures are more expensive than GI structures, but they are more durable and long-lasting. They are also lightweight, which makes them easier to install and transport. Aluminum structures are resistant to corrosion and rust, which means they require less maintenance over their lifetime.
When considering a solar mounting structure, there are a few things to keep in mind:
Load-bearing capacity
The mounting structure should be able to bear the weight of the solar panels and any additional loads such as wind.
Tilt angle
The mounting structure should be adjustable to ensure that the solar panels are at the optimal tilt angle for the specific location.
Installation
The mounting structure should be easy to install and should come with all necessary hardware and instructions.
Weather resistance
The mounting structure should be designed to withstand all types of weather, including high winds, heavy and rain.
To determine whether a mounting structure can withstand all types of weather, it is essential to consider the wind and snow load capacity of the structure. The wind load capacity is the amount of wind pressure that the structure can withstand, and the snow load capacity is the weight of snow that the structure can hold.
The wind load capacity of a solar mounting structure depend on various factors such as the height of the structure, the location, and the specific design of the structure.
These values can be calculated by a structural engineer, and it is recommended to choose a mounting structure that has been tested and certified to meet the relevant safety standards.
Off-grid, On-Grid, and Hybrid Inverters: What They Are and How They Differ
07 February 2023
Off-grid, on-grid, and hybrid inverters are three types of inverters used in solar power systems. Each type of inverter is designed to meet different needs and requirements.
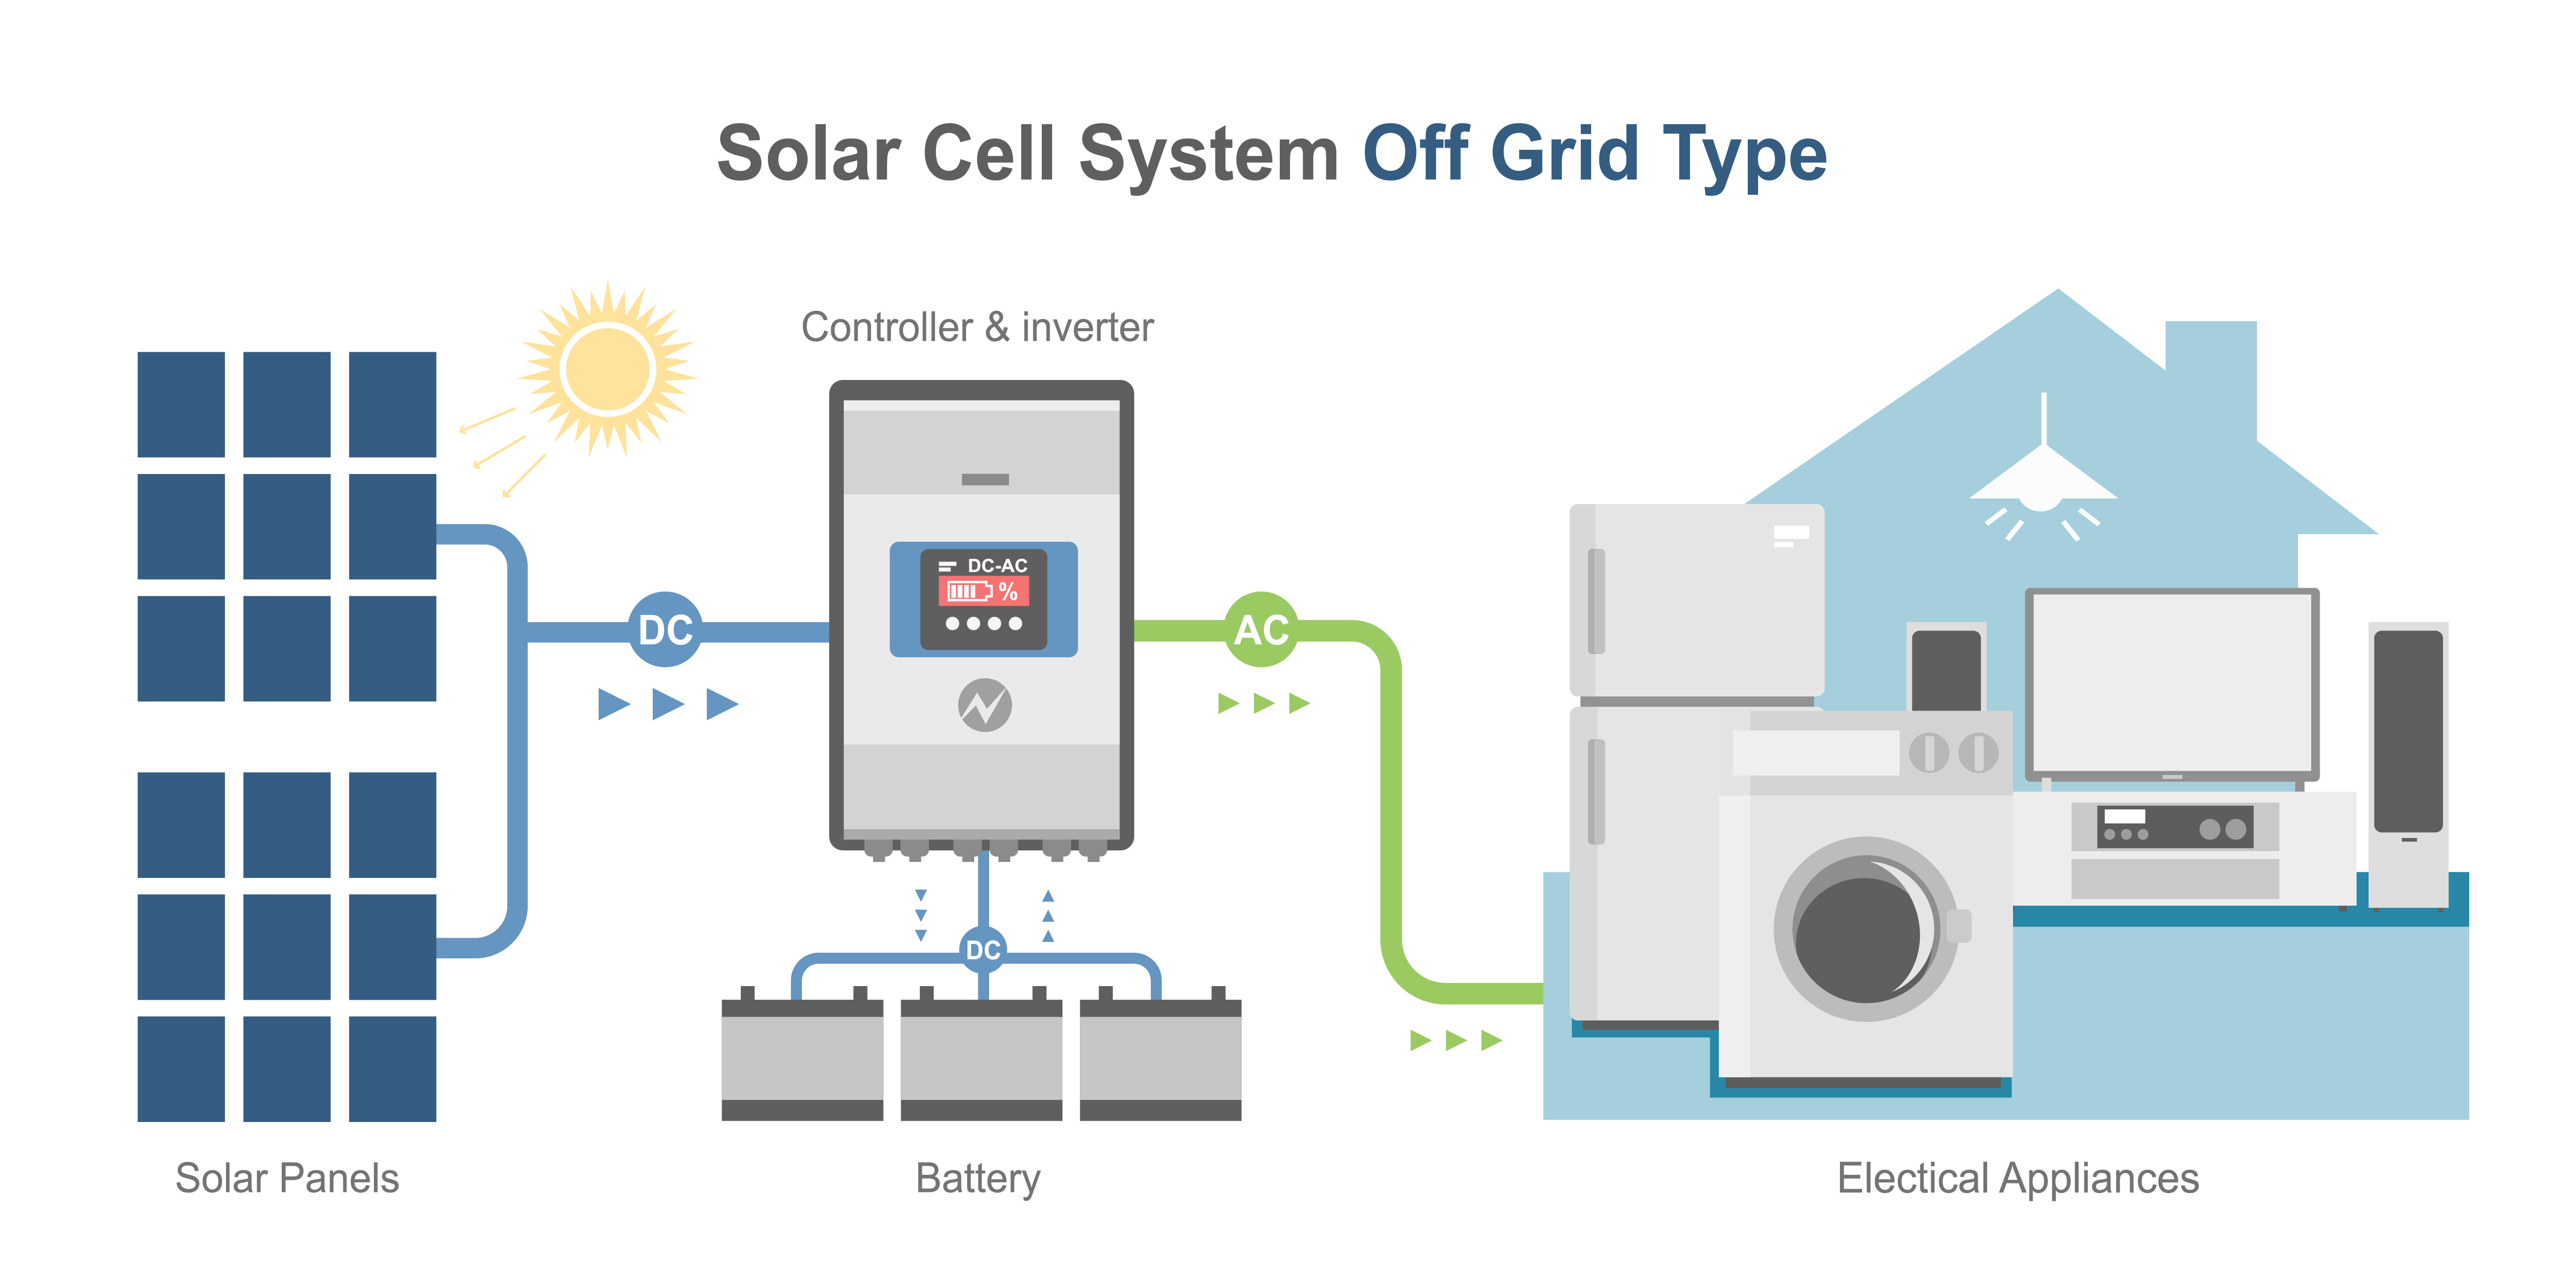
Off-grid Inverter
An off-grid inverter is used in a solar power system that is not connected to the grid. It is also known as a standalone inverter. The off-grid inverter is responsible for converting the direct current (DC) power generated by the solar panels into usable alternating current (AC) power for your home appliances. The off-grid inverter is also responsible for managing the charging and discharging of the battery bank, which is used to store excess energy generated by the solar panels.
Off-grid inverters are typically used in remote areas where there is no access to the grid. They are also used in applications where there is a need for backup power in case of grid failures. Off-grid inverters are usually larger in size than on-grid inverters and are designed to handle a wide range of loads and battery capacities.
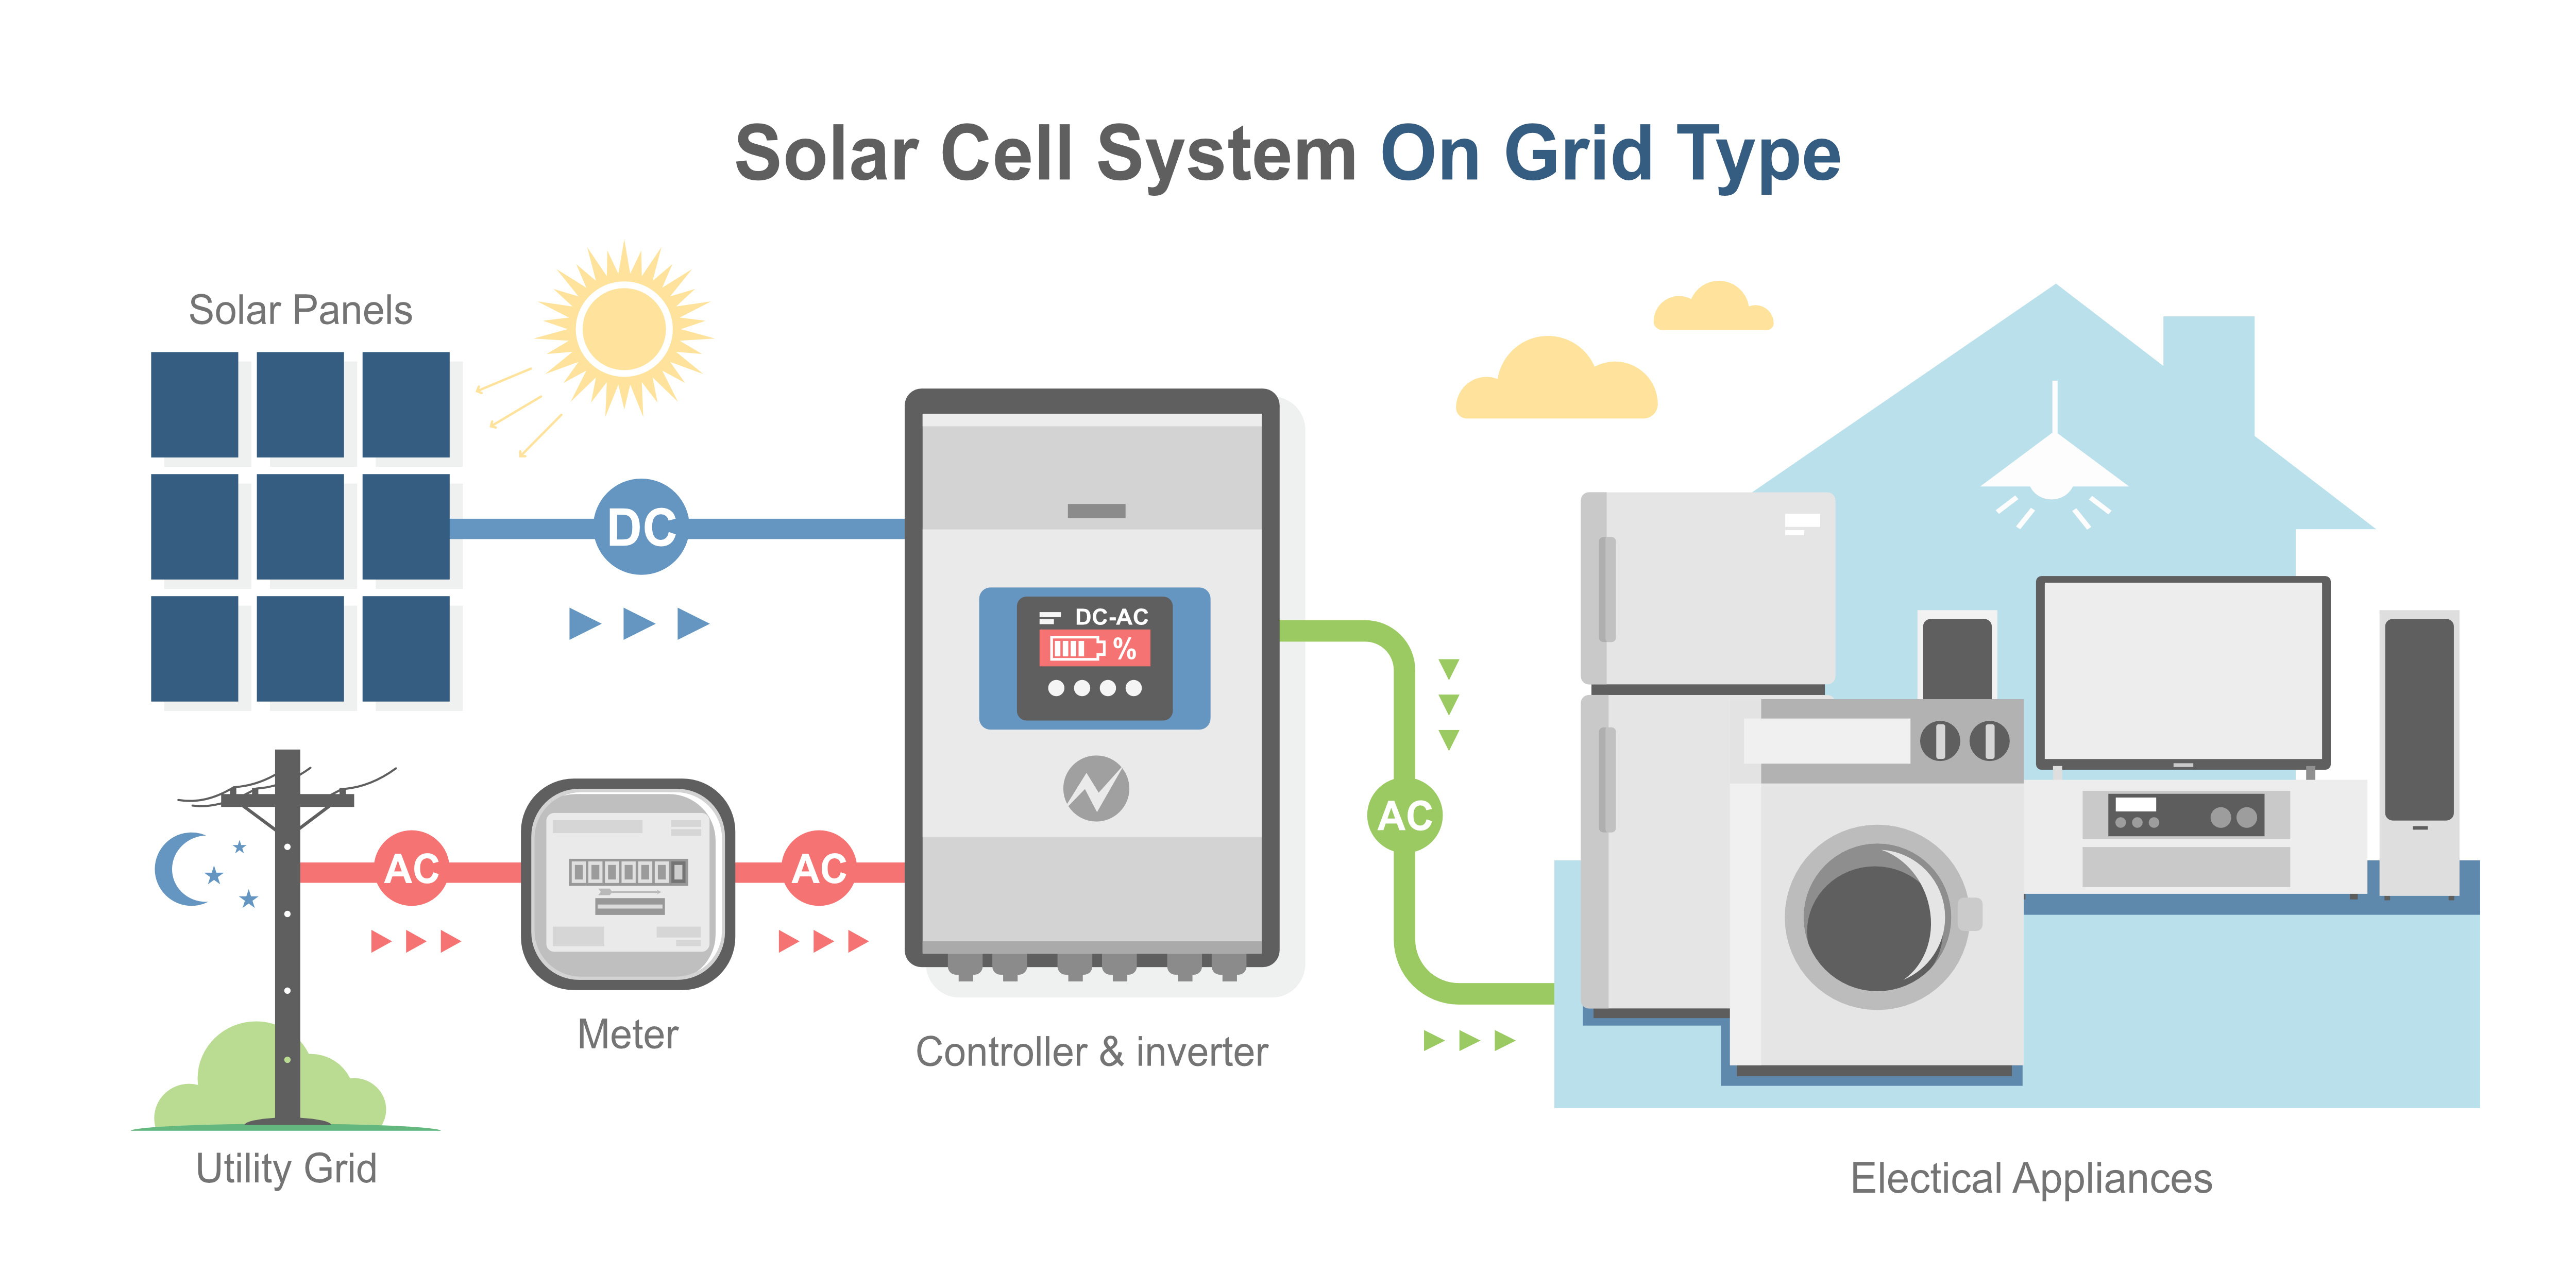
On-grid Inverter
An on-grid inverter, also known as a grid-tied inverter, is used in a solar power system that is connected to the grid. The on-grid inverter is responsible for converting the DC power generated by the solar panels into AC power that can be used in your home appliances. It is also responsible for synchronizing the frequency and voltage of the power generated by the solar panels with the grid.
On-grid inverters do not have a battery bank and do not provide backup power in case of grid failures. They are designed to feed excess power generated by the solar panels back into the grid. In some cases, the excess power generated by the solar panels can be sold back to the grid, depending on local regulations.
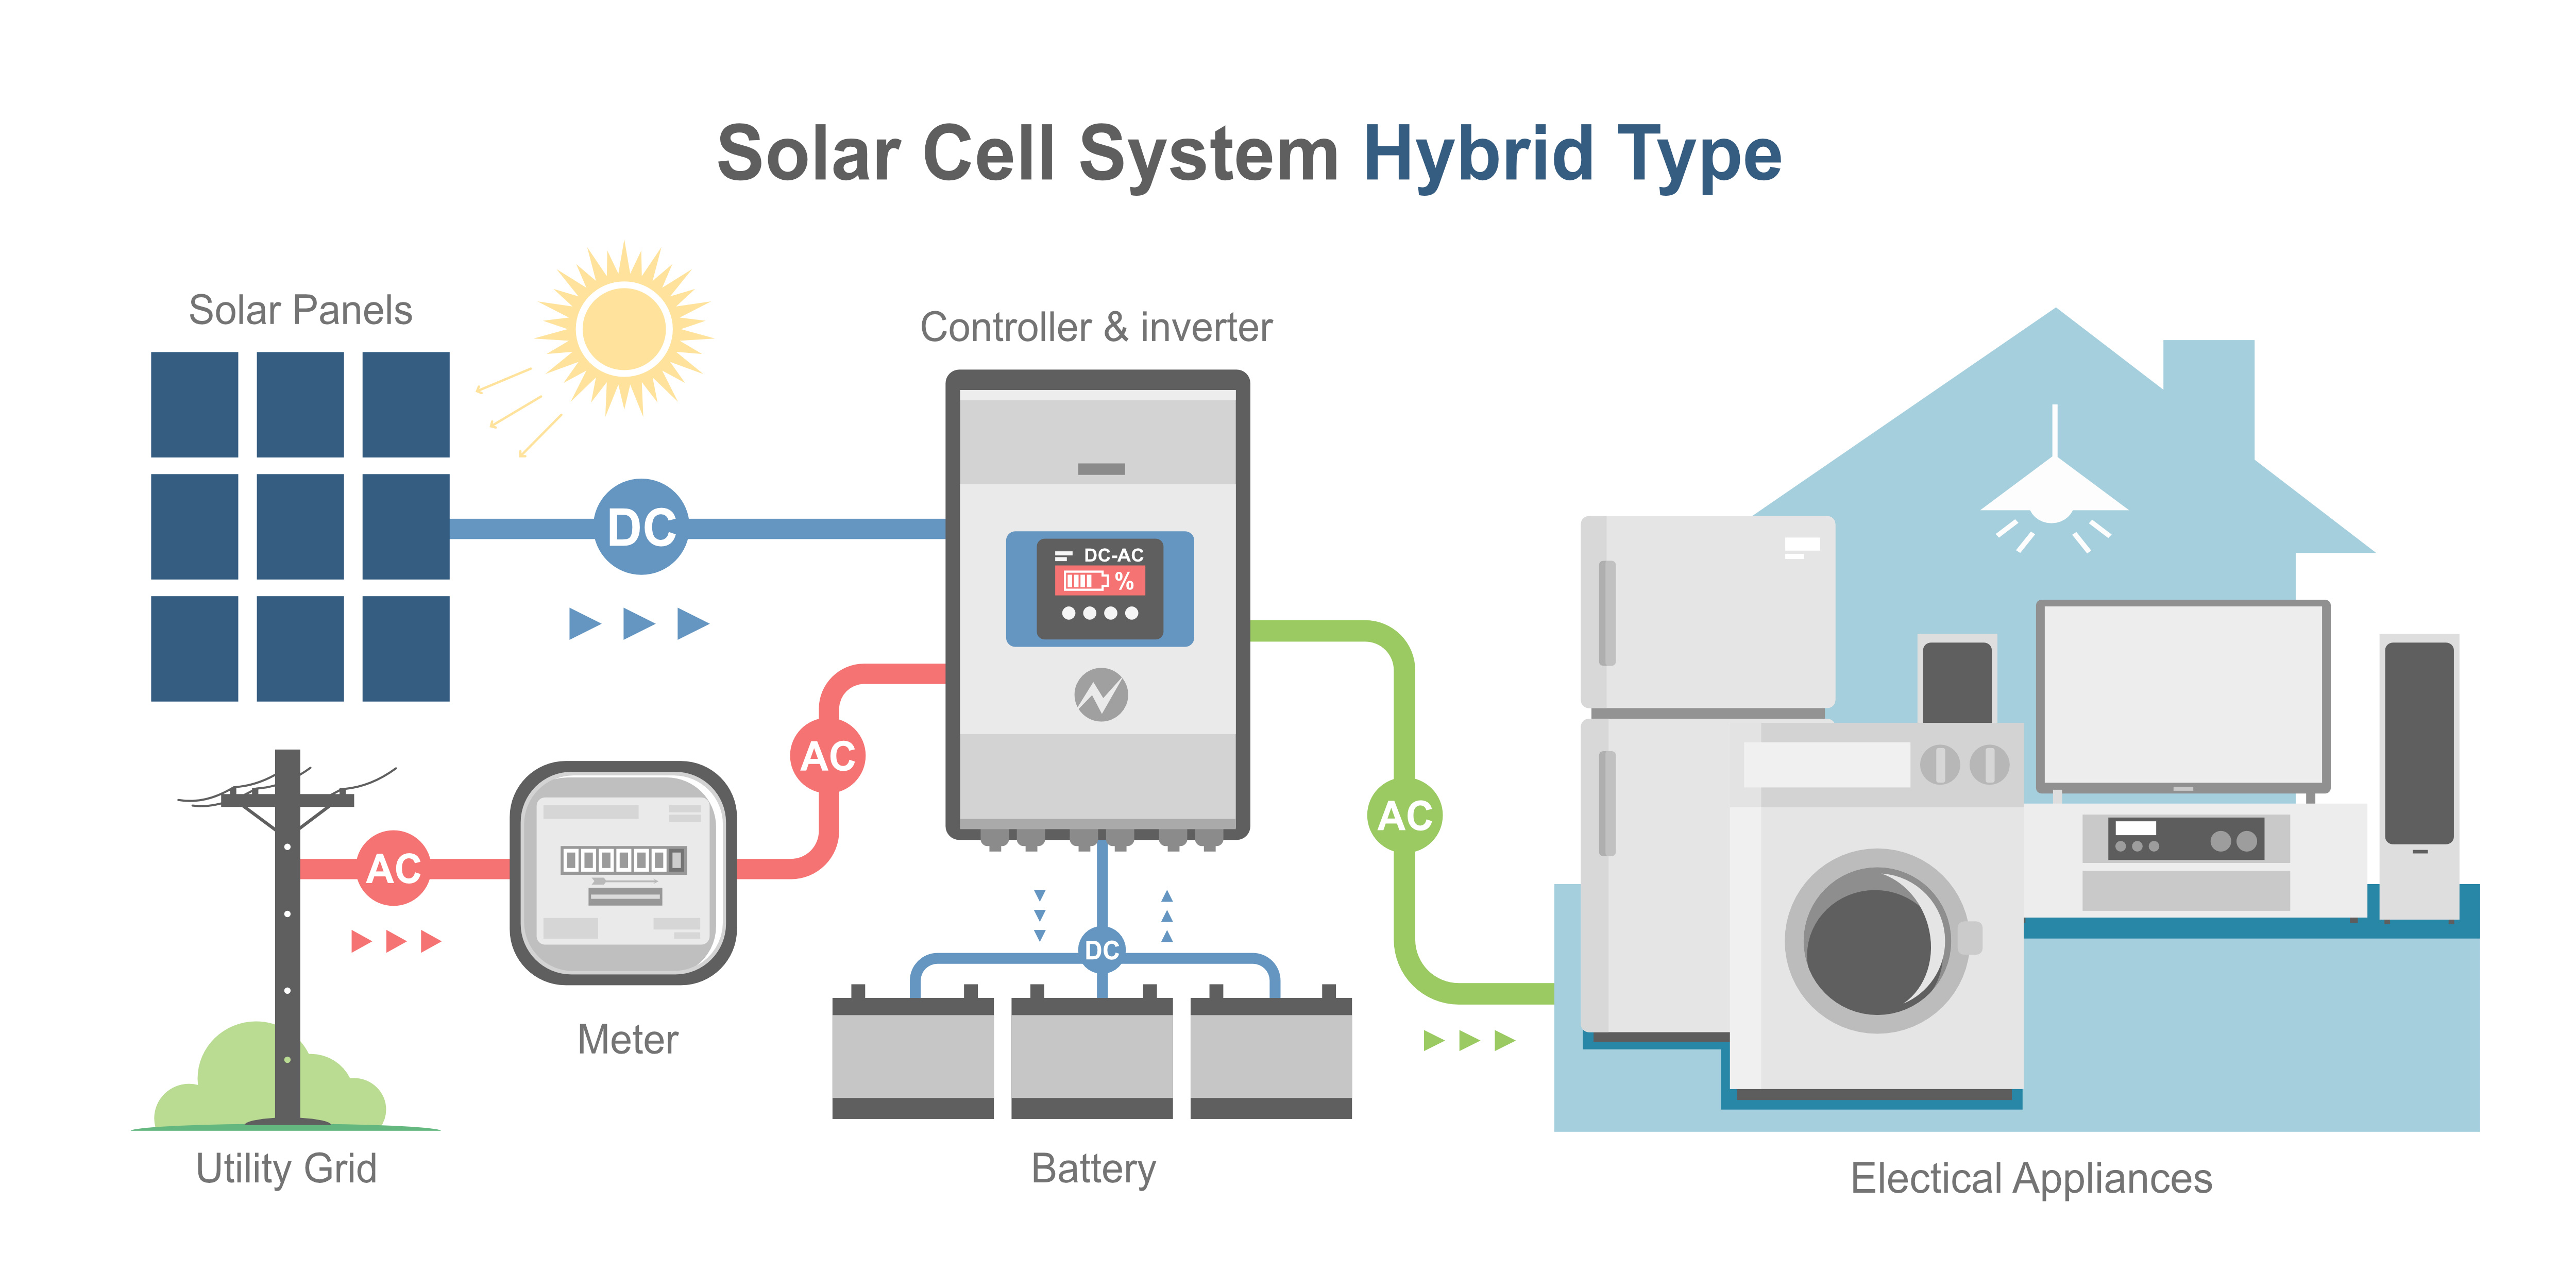
Hybrid Inverter
A hybrid inverter is a combination of an on-grid and off-grid inverter. It is used in a solar power system that is connected to the grid but also has a battery bank for backup power in case of grid failures. The hybrid inverter is responsible for converting the DC power generated by the solar panels into AC power for your home appliances. It also manages the charging and discharging of the battery bank and can switch between on-grid and off-grid modes depending on the availability of power.
Hybrid inverters are ideal for areas with unreliable grid power or for homeowners who want to have backup power in case of grid failures. They are also useful for homeowners who want to take advantage of the benefits of on-grid solar power while still having the option for off-grid backup power.
The significance of the solar panel tilt angle
08 February 2023
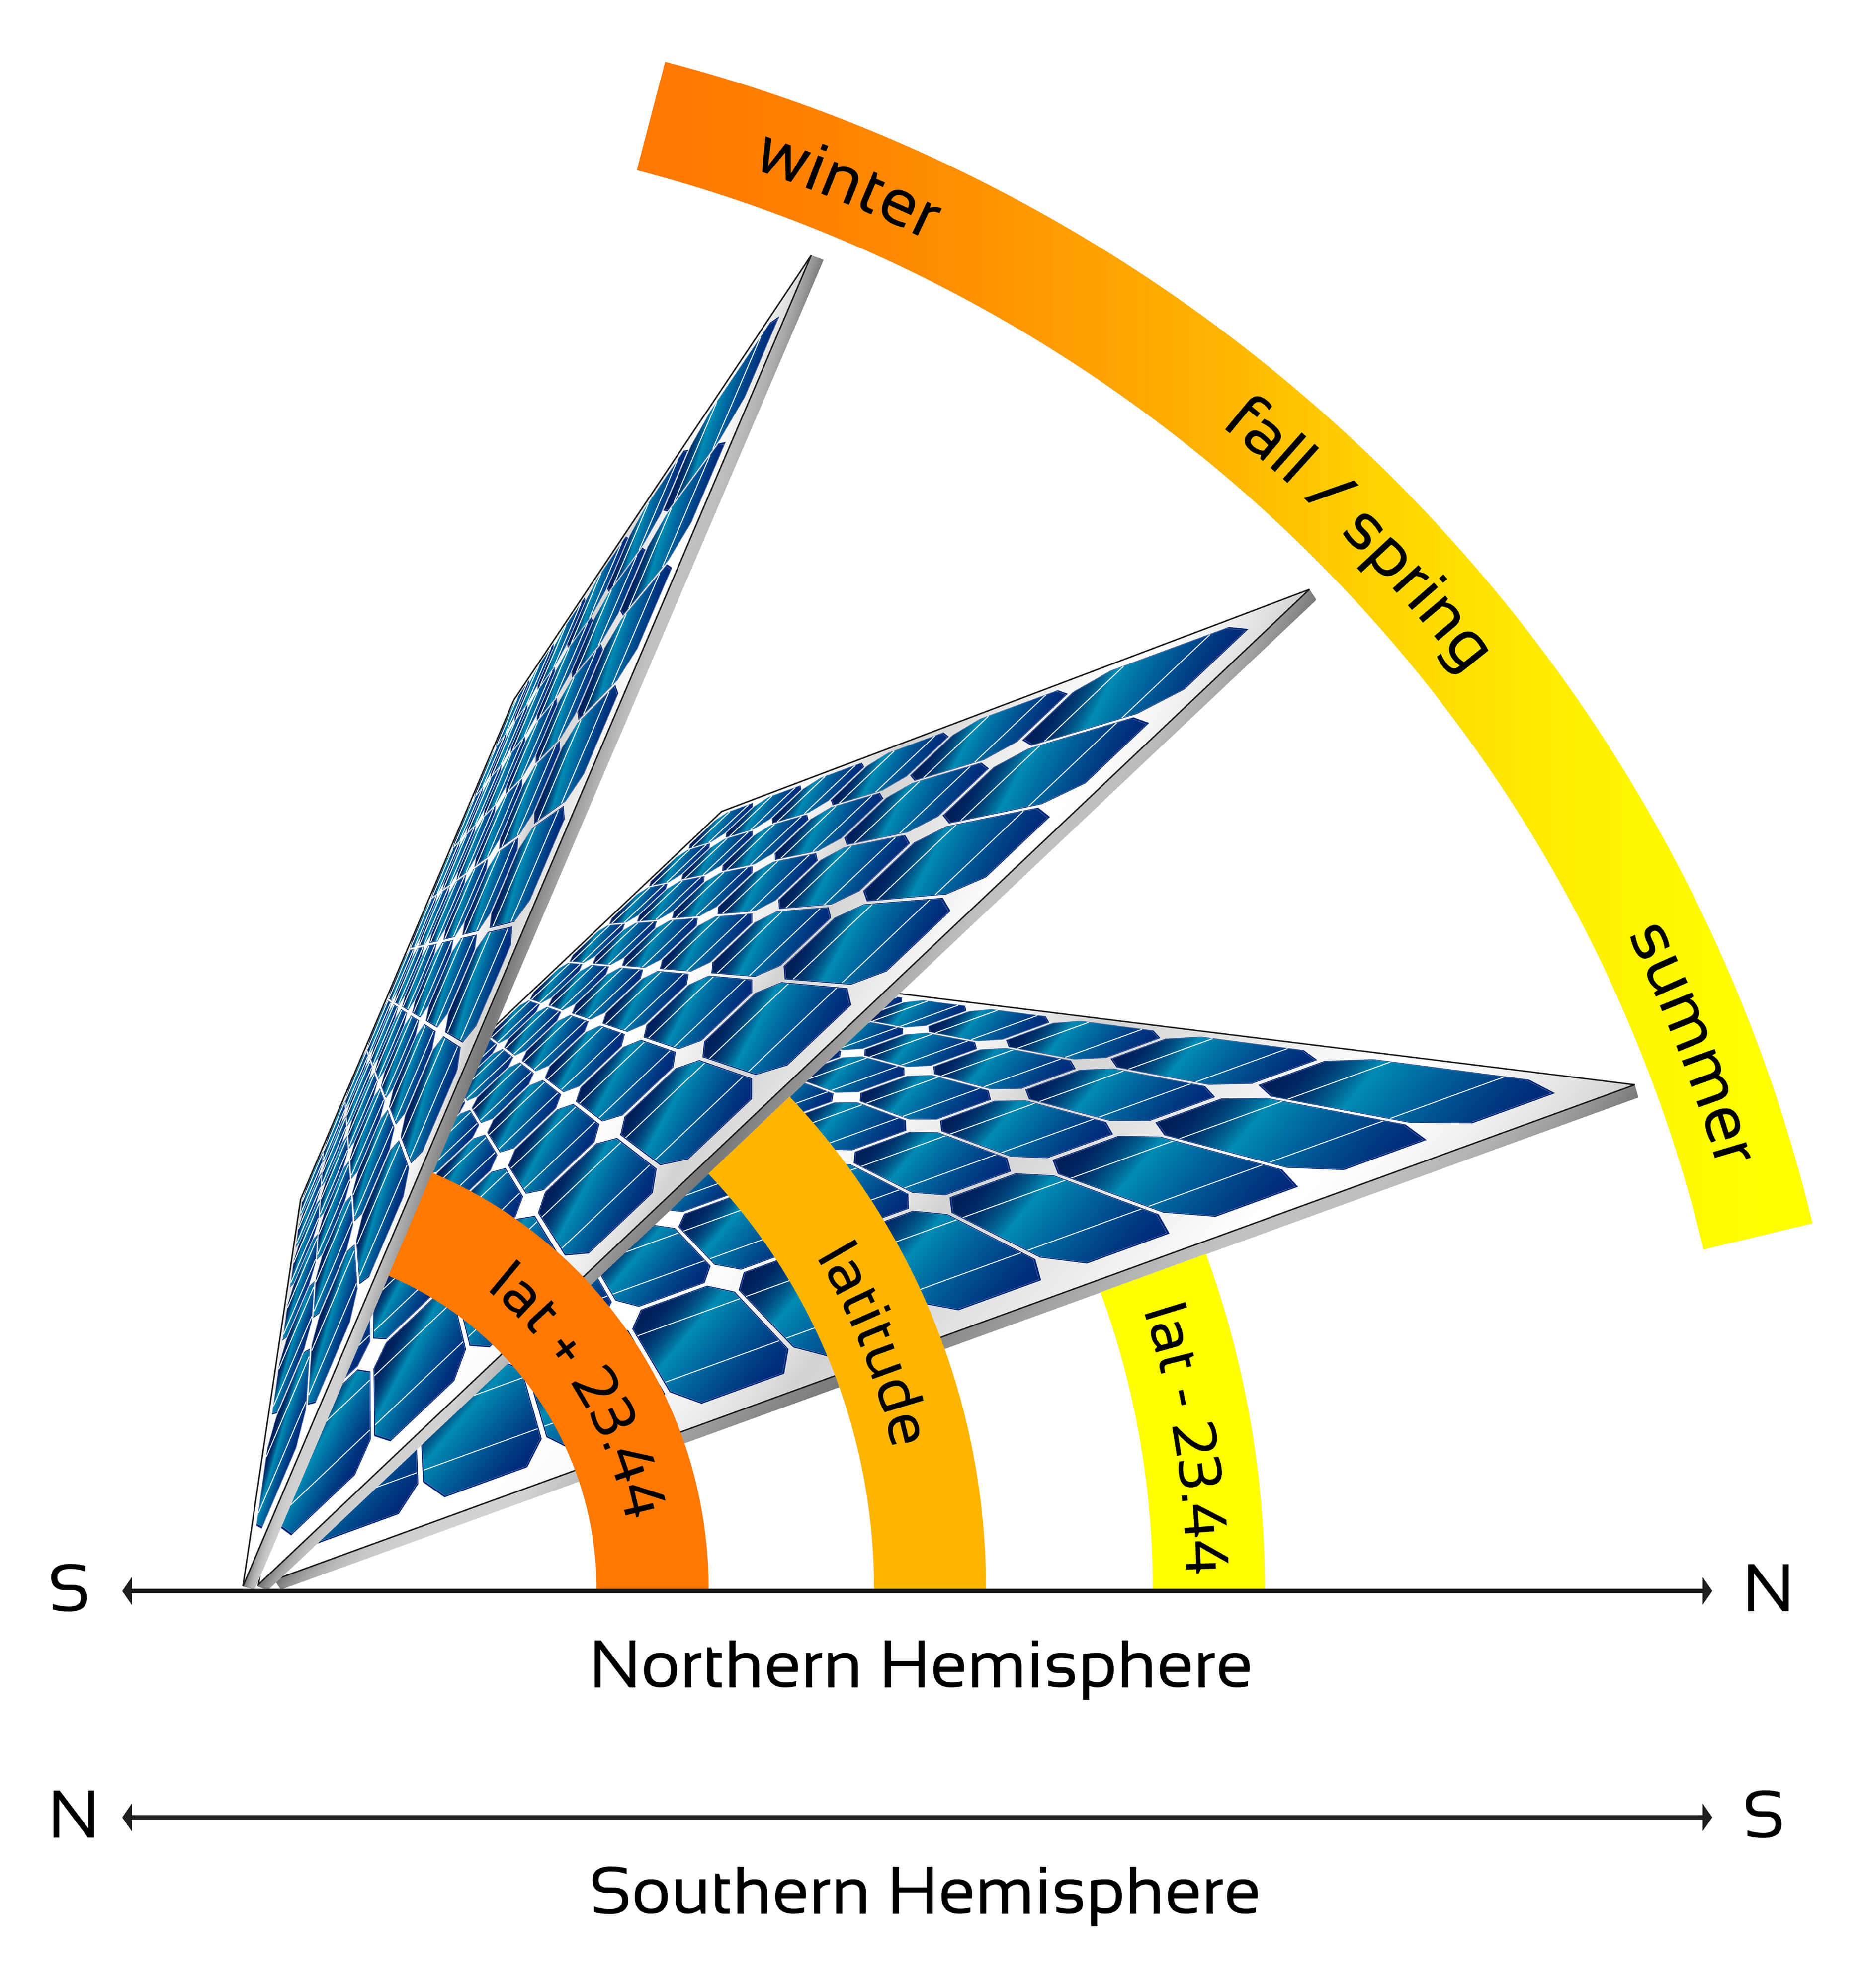
Solar panels are devices that convert sunlight into electrical energy. To optimize the output of solar panels, it is important to consider the tilt angle at which the panels are installed. The tilt angle of solar panels refers to the angle at which the panels are mounted relative to the horizontal plane. The tilt angle of solar panels is significant because it affects the amount of sunlight that the panels receive and, consequently, the amount of electrical energy that they produce. When a solar panel is installed, it should be oriented and tilted to receive maximum sunlight throughout the year.
If the tilt angle is not considered before installation, the solar panel may receive less sunlight and therefore produce less power. This is because the optimal tilt angle for a solar panel depends on the latitude of the installation location and the season. A solar panel that is installed at an angle that is too steep or too shallow for the specific location may not produce as much power as it could.
In Kerala, India, which is located close to the equator, with a latitude ranging from 8.5241° N to 12.4966° N, which means that the angle of the sun's rays is relatively constant throughout the year.
In general, the optimal tilt angle for solar panels in Kerala is between 10 and 15 degrees, as this angle allows the panels to capture the maximum amount of sunlight throughout the year. This is because Kerala is a tropical region, which means that the sun is almost directly overhead during the summer months, and the angle of the sun's rays is relatively high throughout the year. By tilting the solar panels at a low angle, they can capture more sunlight during the year.
However, the optimal tilt angle for solar panels in Kerala can also vary depending on the season. During the winter months, the sun is lower in the sky, and the optimal tilt angle for solar panels in Kerala would be slightly higher, between 15 and 20 degrees. Conversely, during the summer months, when the sun is almost directly overhead, the optimal tilt angle for solar panels in Kerala would be slightly lower, between 10 and 15 degrees.
To calculate the optimal tilt angle for a solar panel in Kerala, we can use the following formula:
Optimal tilt angle = Latitude of location + 15 degrees (for winter) or -15 degrees (for summer)
The latitude of Kerala is approximately 8.5 degrees North. Using this formula, we can calculate the optimal tilt angle for a solar panel in Kerala as follows:
Winter (December solstice):
Optimal tilt angle = 8.5 + 15 = 23.5 degrees
Summer (June solstice):
Optimal tilt angle = 8.5 - 15 = -6.5 degrees
As you can see, the optimal tilt angle of a solar panel in Kerala varies throughout the year. The tilt angle should be adjusted twice a year to ensure that the solar panel is angled optimally to receive the most sunlight.
Another factor to consider when determining the optimal tilt angle for solar panels in Kerala is the type of solar panel being used. Polycrystalline and monocrystalline solar panels are most efficient when they are mounted at a tilt angle between 10 and 15 degrees, which is the same as the optimal tilt angle for the region. Thin-film solar panels, on the other hand, are more efficient when they are mounted at a slightly lower tilt angle of between 5 and 10 degrees.
In addition to the tilt angle, other factors that can affect the energy output of solar panel installations in Kerala include shading, weather conditions, and the orientation of the panels. To maximize the energy output of solar panel installations in Kerala, it is important to ensure that the panels are not shaded by trees or other buildings, and that they are facing in the optimal direction. In Kerala, solar panels should ideally face towards the south or southeast to capture the maximum amount of sunlight throughout the year.
The Importance of Lightning Arresters for Solar Rooftop Systems
05 Aug, 2023 06:07:55
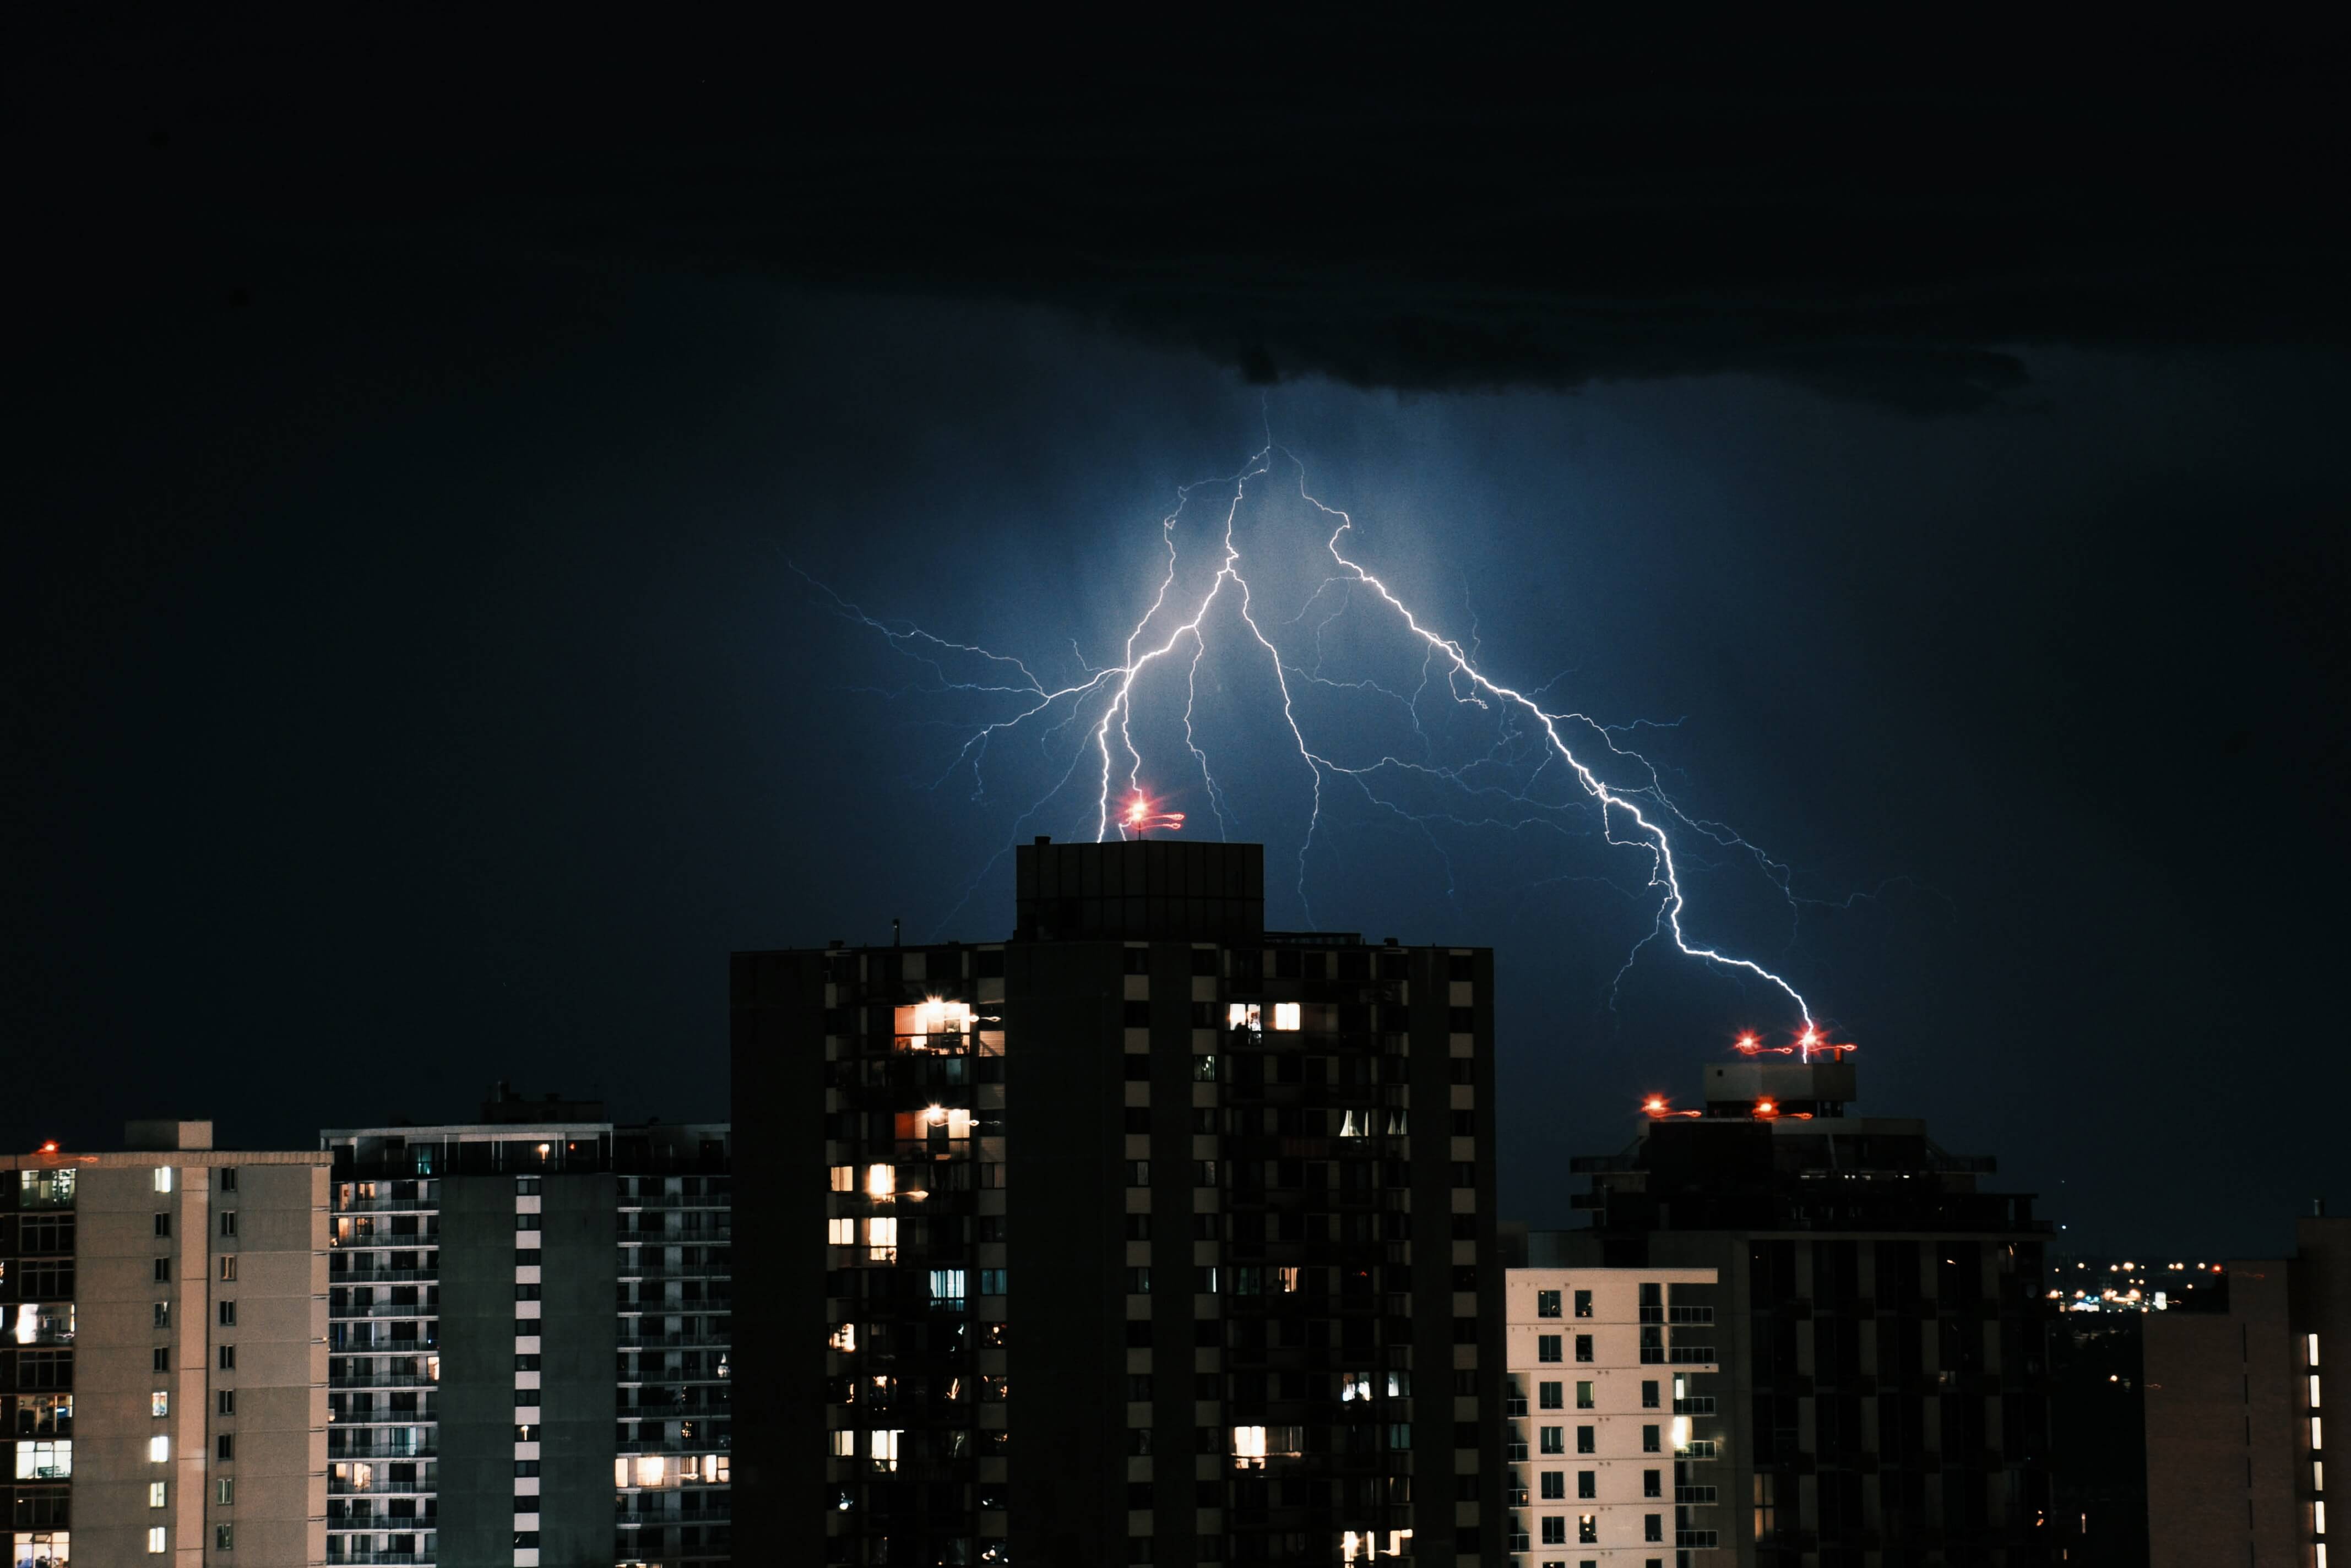
A lightning arrestor is an essential device designed to safeguard electrical equipment and systems from the destructive impact of lightning strikes. Its purpose is to divert the high-voltage current of a lightning strike away from equipment, thus preventing potential damage or destruction and ensuring overall safety.
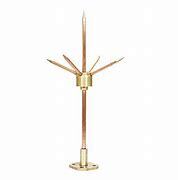
Typically comprised of an arrangement of metal plates or rods separated by non-conductive gaps, lightning arrestors are positioned at the highest points of structures. This strategic placement provides a pathway for the surge voltage resulting from lightning to safely dissipate into the ground. When lightning strikes, the high-voltage current ionizes the air between the metal components, allowing the current to find the path of least resistance and divert harmlessly to the earth.
The significance of installing lightning arrestors becomes particularly evident in the context of solar panel systems, often located atop rooftops and thus more exposed to lightning strikes. A lightning strike on a solar panel can lead to substantial damage to the entire system, including the panels themselves, inverters, and associated components. By incorporating a lightning arrestor, the risk of such damage is significantly reduced, as the device redirects the lightning strike away from the solar panel system, thereby protecting equipment and ensuring safety.
Here's why the presence of a lightning arrestor is of utmost importance for your solar panel system:
1. Lightning Strike Protection: As previously noted, lightning strikes can inflict considerable harm on solar panel systems. By installing a lightning arrestor, the potent high-voltage current is deflected away from the system, effectively shielding equipment and enhancing overall safety.
2. Mitigation of Power Surges: Lightning strikes are notorious for causing power surges, which can lead to equipment damage and pose safety hazards. By employing a lightning arrestor, the surge's high voltage is channeled safely into the ground, averting power surges and their detrimental consequences.
3. Adherence to Safety Regulations: Many safety regulations mandate the integration of lightning arrestors into electrical systems, including solar panel installations, to mitigate potential hazards effectively.
Selecting an appropriate lightning arrestor for your solar panel system necessitates careful consideration of factors such as system voltage, maximum discharge current, and the specific lightning protection requirements. The chosen arrestor must align with the system's unique demands, ensuring compliance with applicable safety standards.
Calculating the maximum discharge current rating involves determining the arrestor's capability to handle the anticipated surge current within the solar panel system. This calculation employs the formula:
Imax = (2kV + 1.5kA) x (total panel area in square feet/1000)
Imax signifies the anticipated surge current,
kV represents the maximum surge voltage,
kA denotes the maximum surge current,
The total panel area refers to the collective area of all solar panels within the system.
For Example,
For 3kW On-grid system,
Total panel area = 30 m²
Now, convert the total panel area to square feet:
Total panel area in square feet = Total panel area × 10.764 (since 1 square meter = 10.764 square feet)
Total panel area in square feet = 322.92 square feet
Imax = (2kV + 1.5kA) x (322.92 square feet / 1000)
Imax = (2 × 2 + 1.5 × 1.5) x 0.32292
Imax = (4 + 2.25) x 0.32292
Imax = 6.25 x 0.32292
Imax ≈ 2.01725 kA
So, for a 3kW rooftop solar panel system with an area of 30 square meters (322.92 square feet) and given surge voltage and surge current values, the calculated maximum discharge current rating (Imax) is approximately 2.01725 kiloamperes (kA).
It's crucial to select a lightning arrestor with a maximum discharge current rating surpassing the calculated Imax to ensure robust protection. The precise requirements for lightning arrestors should be evaluated by a certified electrician or electrical engineer, adhering to local safety regulations.
Regarding costs, conventional lightning arrestors vary based on factors such as coverage radius, material composition, number of spikes, and device size. With these considerations in mind, the price typically ranges from INR 1300/- to INR 7000/- per unit.
When it comes to positioning a lightning arrestor, optimal placement involves situating the arrestor rod at the highest point of the structure, at least 2 meters above the building's top. This configuration enables efficient conduction of voltage surges through the cable connector. The grounding cable links to the base plate of the arrestor rod, with the opposite end connecting to the grounding terminal.
Incorporating a lightning arrestor is a prudent investment that offers protection against the unpredictable forces of nature. By taking this proactive step, you're ensuring the longevity of your solar panel system, safeguarding your equipment, and promoting a secure and sustainable energy future.
Image by wirestock on Freepik